OSSEC FOR WEBSITE SECURITY: PART III – Optimizing for WordPress
The previous OSSEC articles went through through the process of installing OSSEC and deploying a distributed architecture. This article will focus on configuring OSSEC to make better sense of WordPress activity.
WordPress is a powerful open-source Content Management System (CMS). Its biggest security weakness has always been its biggest blessing – its extensibility (e.g., plugin, themes, etc…). The years at Sucuri have taught me that post-compromise there is nothing more important than have good logs. They are the key to understanding what happened. They are also the key to identifying a bad actors intent before their actions materialize into something nefarious.
Fun fact: The premise of the Sucuri Security plugin was almost exclusively for this visibility. Over the years we added more features to accommodate a more robust application security toolset, but that was always a secondary objective. In fact, the premise of the Sucuri plugin was actually built based on the lessons Daniel learned with OSSEC.
One of its key features was always log aggregation. It would collect the logs and pipe it back to the mother station where we’d store it remotely on behalf of the customers; it was designed this way to provide us a mechanism to perform forensics post-compromise.
In 2016 we released a feature inside the plugin that was designed to pull it all together – WordPress Activity and OSSEC. The intent was to integrate the plugin with the WordPress hooks so that the user could gain visibility into the application activity, activity that access logs would not highlight. This activity would be piped into a new log format, and OSSEC’s decoder would make sense of the new log format so that as the user you clearly understood what was going on.
This article will use OSSEC and the Sucuri Security WordPress plugin to bring your logs to life.
Configuring Sucuri Security WordPress Plugin to Export Logs
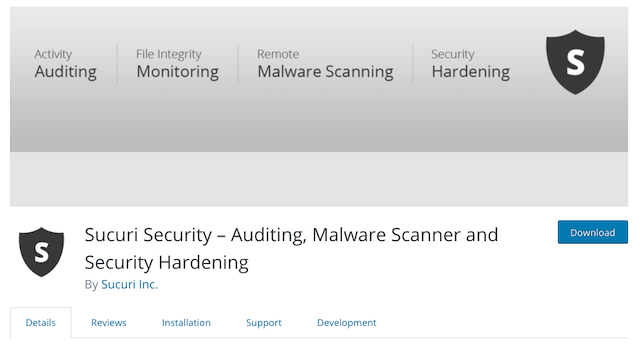
This articles assumes you’ve already installed the Sucuri Security WordPress plugin (a guide is available).
You will find the option to export the logs here: Sucuri Security > Settings
Scroll down to the section that reads Log Exporter
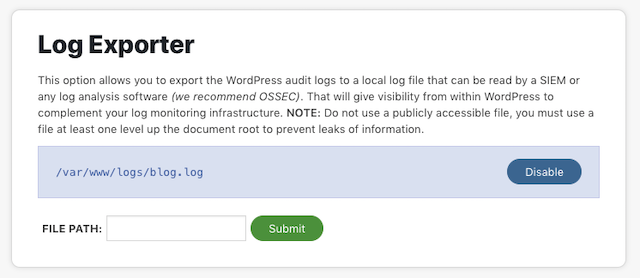
A couple of pro tips when selecting your file path:
- You want to entire the path, and file name. Example: /var/www/logs/blog.log
- The path has to be writeable, so be sure to check the user and the associated permissions
- It doesn’t like it if you try to put it at the root of the site, you need to navigate up a directory or the plugin won’t allow you to deploy it. We did this because we didn’t want the file to be accessible to the outside world (avoid information leakage).
Once you’re done, log out and back in; if all went well, you’ll see new log entries in the file:
# tail -f blog.log
2018-12-01 01:59:40 WordPressAudit perezbox.com tony@perezbox.com : Notice: [your ip]; User authentication succeeded: administrator
2018-12-01 02:00:00 WordPressAudit perezbox.com tony@perezbox.com : Notice: administrator, [your ip]; Post was updated; ID: 80; name: OSSEC FOR WEBSITE SECURITY: PART III – Optimizing for WordPress Activity
You see that a user logged in, the IP they came from, and it shows a post was updated. This was important because if you think to how SEP attacks work, attacker would update existing articles with SEO Spam. In the process they would update posts, articles, pages and the user would be none the wiser. As the webmaster, seeing updates to posts and pages should be a red flag – especially if they are unexpected (e.g., odd hours, random users, etc…). This is what you’d consider to be an Indicator of Compromise (IoC).
If you see these logs proceed to the next step to configure OSSEC.
Configure OSSEC to Consume Sucuri Security Logs
Around the same time that we released the plugin update, we also updated the OSSEC WordPress rules. The updates were designed so that website owners would not have to write new decoders to parse and analyze the new logs. This means all we have to do is add the log you created above to the ossec.conf file.
You do this by using the utility shell provided with OSSEC. In your terminal, run the following command:
# /var/ossec/bin/util.sh addfile /var/www/logs/blog.log
/var/ossec/bin/util.sh: File /var/www/logs/blog.log added.
The util.sh shell was created to help you when adding new log files. It will automatically create the appropriate configuration inside your ossec.conf file.
Example configuration change applied to the configuration file:
    <ossec_config>
      <localfile>
      <log_format>syslog</log_format>
      <location>/var/www/logs/blog.log</location>
     </localfile>
   </ossec_config>
Pro Tip: If you run your own VPS and manage a bunch of sites on the same server, adding each log file can be really annoying using this process. You could use the following script that was shared in by SimonF in my article in 2013. Update the path to the path you’re using for the new WordPress logs.
#!/bin/sh
for i in $( find /var/www/logs/ \( -iname "*.log" \) ); do

/var/ossec/bin/util.sh addfile $i

done
The final step is to restart the OSSEC server:
# /var/ossec/bin/ossec-control restart
Monitoring your alerts.log will show the following alert if you log back into your WordPress site:
2018 Dec 01 01:59:41 (pb.webserver1) any->/var/www/logs/blog.log
Rule:9502 (level 3): WordPress authentication succeeded.
IP:47.180.59.33 / USA / California
2018-12-01 01:59:40 WordPressAudit perebzox.com tony@perezbox.com : Notice: [your ip], User authentication succeeded: administrator
From here you can tune and create your own alerts.
OSSEC & WordPress Rules Cheat Sheet
The rules created inside OSSEC for WordPress are not meant to be all encompassing, but here is a quick cheat sheet to make sense of them:
[table width =”100%” style =”” responsive =”false”]
[table_head]
[th_column]ID[/th_column]
[th_column]Name[/th_column]
[th_column]Description[/th_column]
[/table_head]
[table_body]
[table_row]
[row_column]9501[/row_column]
[row_column]User Authentication (Failure)[/row_column]
[row_column]WordPress Authentication failed for a user.[/row_column]
[/table_row]
[table_row]
[row_column]9502[/row_column]
[row_column]User Authentication (Success)[/row_column]
[row_column]WordPress Authentication succeeded for a user.[/row_column]
[/table_row]
[table_row]
[row_column]9505[/row_column]
[row_column]Comment Flood[/row_column]
[row_column]WordPress comment flood attempt – someone leaving a bunch of bad stuff in your comments (or trying to). [/row_column]
[/table_row]
[table_row]
[row_column]9506[/row_column]
[row_column]File Modification[/row_column]
[row_column]A file was modified.[/row_column]
[/table_row]
[table_row]
[row_column]9507[/row_column]
[row_column]Post (Private to Published)[/row_column]
[row_column]A post was published.[/row_column]
[/table_row]
[table_row]
[row_column]9508[/row_column]
[row_column]Post Updated[/row_column]
[row_column]An existing post was updated.[/row_column]
[/table_row]
[table_row]
[row_column]9509[/row_column]
[row_column]Plugin Updated[/row_column]
[row_column]A plugin was was updated.[/row_column]
[/table_row]
[table_row]
[row_column]9510[/row_column]
[row_column]IDS Triggered[/row_column]
[row_column]Intrusion Detection System (IDS) identified a WordPress attack.[/row_column]
[/table_row]
[/table_body]
[/table]
It’s been a while since we’ve touched these rules so I’m thinking of making some updates. For now, this should help understand what is available.
Hope this helps, and like always, welcome thoughts and feedback.